 Support
How to configure FreeNAS replication to a ZFS StorageNode
Setting up FreeNAS replication to your StorageNode ZFS Cloud instance is pretty straight forward. The following steps are required to get up and going:
Enable Periodic Snapshots
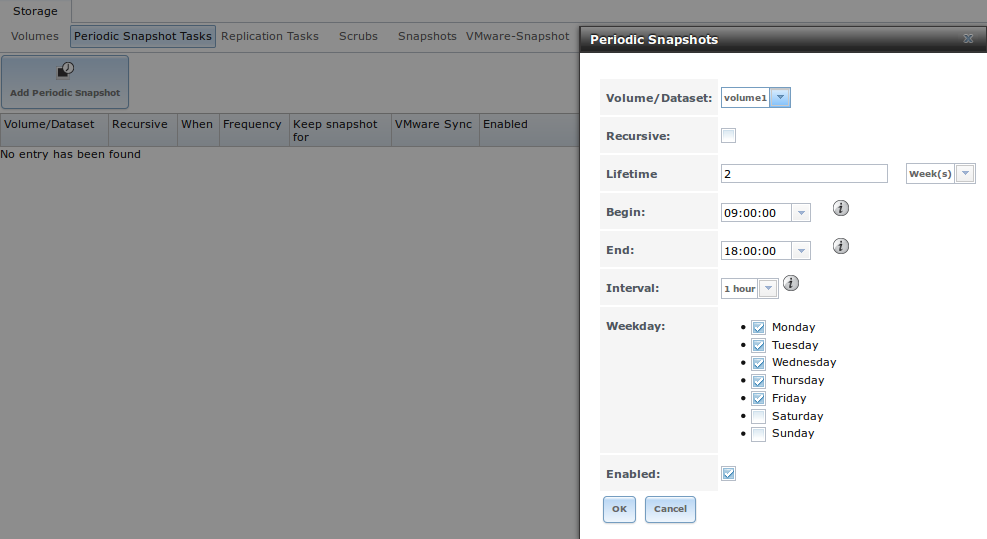
A periodic snapshot task allows you to schedule the creation of read-only versions of ZFS volumes and datasets at a given point in time
Authorise FreeNas Replication Key
The public key used for authenticating the replication user on the StorageNode Target
Enable Replication Tasks
A replication task allows you to automate the copy of ZFS snapshots to another system over an encrypted connection
Enable Periodic Snapshots Tasks of your Dataset
A periodic snapshot task allows you to schedule the creation of read-only versions of ZFS volumes and datasets at a given point in time.
Snapshots provide a clever way of keeping a history of files, should you need to recover an older copy or even a deleted file. For this reason, many administrators take snapshots often, store them for a period of time and store them on another system (e.g. SolNode ZFS Storage). Such a strategy allows the administrator to roll the system back to a specific time or, if there is a catastrophic loss, an off-site snapshot can restore the system up to the last snapshot interval.
- Go to: Storage → Periodic Snapshot Tasks → Add Periodic Snapshot
Specify the options you want, including the retention period of your snapshots (at least a month is recommended.)
Authorise FreeNAS Replication Key
The FreeNAS replication key will need to be established as an authorized_key for the root user account of your ZFS cloud StorageNode.
- The FreeNAS replication key can be copied from the FreeNAS WebUI:
Go to: Storage → Replication Tasks → View Replication Tasks
- Hit the “View Public Key” button, which will display the following popup window:
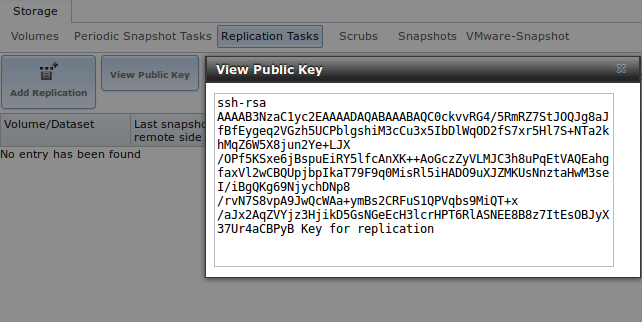
- Copy the ssh key above to the root
.ssh/authorized_keysfile in your StorageNode. This can be done via the command line of your FreeNAS host.
[root@freenas] ~# cat /data/ssh/replication.pub | ssh <storagenode.url> -p <port#> -l admin "sudo dd of=/root/.ssh/authorized_keys"
Enable Replication Tasks
To enable replication, you will need to have the details of your backup dataset name within the StorageNode. This should be specified when you created the StorageNode. If not, you can get these details easily with the following command from the StorageNode.
- Login to your StorageNode as the admin user
- Run the following command to list the dataset name from your StorageNode
# sudo zfs list -Ho name zones/$(zonename)/data - This will list the destination dataset name of your StorageNode, such as :
zones/055beb2a-90a9-40d4-a1e2-1bda359d9d7a/data - From the View Replication Tasks window, click the Add Replication button, which will display the following window.
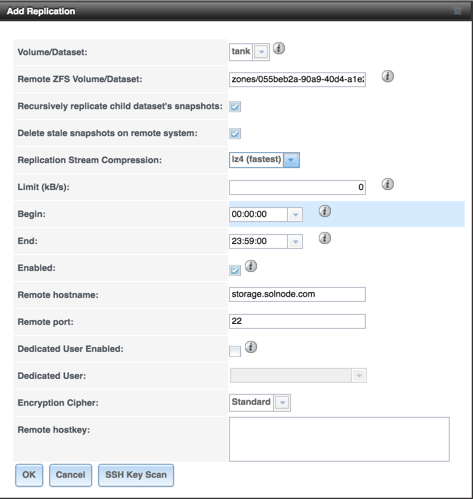
- Fill in the details of the form. The most relevant options are outlined below:
- Remote ZFS Volume/Dataset: specify the dataset details from the previous step, e.g.
zones/055beb2a-90a9-40d4-a1e2-1bda359d9d7a/data - Recursively replicate child dataset’s snapshots: enable true or false, as per your preferences.
- Delete stale snapshots on remote system: enable true (recommended) as setting false will consume more of your space quota on the StorageNode.
- Replication Stream Compression: LZ4 compression algorithm is recommended as this gives the overall performance and compression qualities, but all options are supported.
- Remote hostname: specify the hostname, as was provided as a part of the creation of your StorageNode instance.
- Remote port: specify the TCP port, as was provided as a part of the creation of your StorageNode instance.
- Dedicated User Enabled: Leave disabled.
- Remote ZFS Volume/Dataset: specify the dataset details from the previous step, e.g.
- Hit the “SSH Key Scan” button, which will populate the Remote hostkey field.
- Hit “OK“
- Replication of your dataset should start after a few minutes. Replication debug logs (
/var/log/debug.log) are available from the FreeNAS CLI:
[root@freenas] ~# tail -100f /var/log/debug.log | grep autorepl